Surprise your audience with a sudden “WOW” factor of both flying a drone and realizing it’s moving from inside to outside.
Transitioning a drone’s flight from indoors to outdoors isn’t merely about flaunting a skill; it’s a cinematographic art. This technique offers a storytelling arc.
Read on for a tutorial to help both novices and seasoned drone enthusiasts capture shots safely and effectively.
As with any skill, practice is key. Familiarize yourself with your drone’s features, understand its behavior in different environments, and always prioritize safety.
1. Prioritizing GPS Stability
Before your drone takes off, it’s imperative to secure a solid GPS connection. Buildings, particularly those with thick walls or brick structures, can seriously interfere with GPS signals. This interference can cause an unexpected drift in your drone’s position, potentially leading it to collide with indoor objects. To avoid this:
- Switch on your drone and the controller
- Allow it to sit for a few minutes to establish a connection, preferably near a window or open space
- Always keep an eye on the GPS signal strength on your controller
Even if your drone has established a solid connection, it will still act differently indoors. Interference can kick in at any time causing your drone to drift. The key? Take it slow.
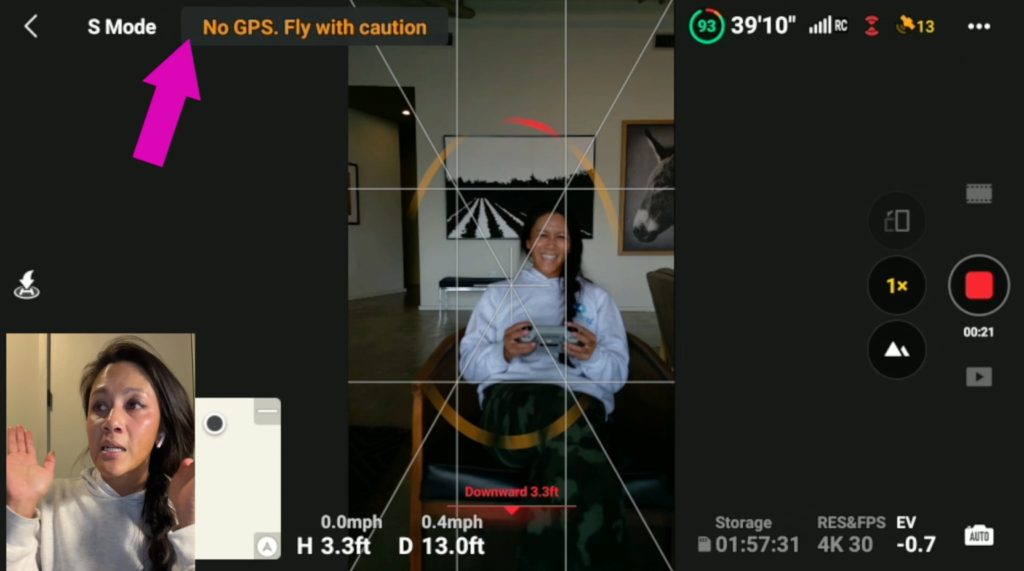
2. Horizontal Takeoff: The Safety Checkpoint
Even if your envisioned shot will be taken vertically for Instagram or Tik Tok, it’s recommended to start horizontally to get your bearings.
This approach grants a wider field of view, enabling you to gauge potential obstructions or risks in the drone’s path. After ensuring a safe surrounding, you can then shift to the desired orientation for your shot.
Want to SEE why this is the case? See the full video tutorial here or by clicking below.
3. Sport Mode: Your Best Bet Indoors
When navigating through tight spaces, your drone sensors that are meant to protect you, can actually do the exact opposite.
Flying in tight spaces confuses the sensors (also known as “obstacle avoidance”). For example, it might “avoid” one wall and JUMP into the wall next to it.
This is why turning them off – or enabling the sport mode is highly recommended.
In standard modes, your drone might react unpredictably to close-proximity objects due to its sensors. This might not only ruin your shot but also risk the drone’s safety. Sport mode, in most drones, deactivates these sensors, giving you a smoother flight experience.
Become a PRO at flying your drone
MASTER your drone and gain the confidence to EASILY fly!
Whether you’re just getting started, or trying to become an advanced pilot selling your drone photography and videography, consider checking out the drone courses!
4. For Once, Record Everything
Writing this one makes me cringe.
I like to START the flight (further back than I need), then while in motion, hit record. This minimizes the editing, but in this instance, sometimes you need to keep “re-setting up the shot” and there simply isn’t time to make all the adjustments.
Continuous recording might sound like a storage-consuming tactic, but for this style of shot, it makes sense to do it.
Want more drone tips like this? Consider checking out all the helpful blog posts by clicking here, or the entire playlist of helping drone tips for those who are looking to move past beginner and into intermediate/advanced drone shots.
5. Gentle and Extensive: The Flight Mantra
Avoid rushing your drone, especially during the initial moments. A slow, controlled flight ensures safety and captures details more elaborately. Literally. Fly under 5mph. Too often people like to CRANK THE STICKS and it literally hurts my eyeballs (or ear balls) when this happens.
Also, when transitioning outdoors:
- Fly farther than you believe is necessary. This gives you ample footage to choose from during editing.
- It’s less challenging to speed up footage later than to artificially slow it down without causing jitter.
- Extensive footage allows for seamless transitions and offers room for creativity during edits.
6. Crafting the Perfect Shot with Final Cut Pro
For those keen on refining their footage, Christine’s method in Final Cut Pro offers a detailed roadmap:
- Trim to Perfection: Start with eliminating redundant sections, focusing on the essence of the shot.
- Frame Alignment: Adjust your footage for optimal framing. Ensure your subject, possibly yourself, remains the center of attention throughout.
- Dynamic Speed Ramping: Add layers of intrigue by playing with the speed. Quick actions within the first two seconds, especially for platforms like Instagram or TikTok, are essential to retain viewer attention.
- Art of Color Grading: Enhance your visuals through color corrections. Create a preset and re-use it over and over.
- Render, Review, Repeat: I like to send it to my phone for a quick look, then edit it. Practice like you play.
Bottom Line
Creative shots are really fun, but can be really stressful to get. As a recap – after ensuring that permissions are gained, it’s important when flying close to things to first look at your drone both literally and through the controller while flying horizontally to understand the boundaries.
To prevent hitting something, fly in sport mode – then record the entire time and trim it, and fly slower than you think is necessary.
Additionally, because flying indoors can cause drifting, ensure that the drone has a good GPS signal and go slow.
Ultimately, this is a great way to incorporate the drone into a project or to create a unique perspective on video footage.